Over time on Windows systems, it’s inevitable that old device drivers get supplanted by new ones. Even on systems where drivers aren’t rigorously maintained, Windows Update will typically update at least a dozen drivers annually.
Those who pursue driver currency more vigorously may also use tools like the Intel Driver & Support Assistant (DSA), Nvidia’s GeForce Experience (which checks Nvidia graphics, sound, and 3D drivers), or general driver management tools such as ioBit’s Driver Booster or the SourceForge Snappy Driver Installer project to check and update drivers on Windows 10 or 11 PCs. The Intel and Nvidia offerings concentrate on devices they make, whereas general-purpose driver update tools check all of them and point you at drivers in need of updating, with varying degrees of help and support in getting them installed.
Neither vendor-specific nor vendor-agnostic update tools remove old drivers as they cheerfully add new ones. Thus, while every driver update tool that I know of helps keep drivers up to date, they do nothing to relieve driver bloat. In fact, the Intel DSA is spectacularly good at adding to driver bloat, as you’ll see later in the story.
All those unnecessary drivers eat up storage space and may slow down your system, so it’s good PC maintenance practice to clear out the driver cruft.
What happens when you install a Windows driver?
This is actually quite a fascinating process and involves a lot of behind-the-scenes action in Windows. For this discussion, I’ll stick to so-called Plug and Play (PnP) devices. These are purpose-built to announce themselves to Windows so that it can assist in finding a device driver to use, if not always the latest and greatest instance. My information comes courtesy of the terrific Microsoft Press book Windows Internals (7th edition in 2 volumes, as of this writing). Here’s the process:
- A bus driver informs the PnP manager about a device it discovers during enumeration using a device instance identifier (DIID).
- The PnP manager checks the registry for a corresponding function driver. When it fails to find one, it tells the user-mode PnP manager about that device using its DIID.
- The user-mode PnP manager tries to perform an automatic install without user input or intervention. For installers that involve posting of dialog boxes requiring user input, the PnP manager executes a Hardware Installation Wizard to oversee such task(s) if the logged-in user has admin privileges. (If not, this activity will be deferred until an admin-level user next logs in.)
- The Hardware Installation Wizard uses Setup and CfgMgr (Configuration Manager) API functions to locate INF files that correspond to drivers that are compatible with the detected device. Mostly, this involves accessing such files from the local file system (or media like a CD or DVD) at the user’s direction.
- Installation proceeds in two steps: (a) The third-party driver installer imports a driver package into the driver store, and (b) the OS performs the actual driver installation, using the Drvinst.exe process (the executable for which resides in %SystemRoot%\System32\). As part of that process, .inf and .cat files are deposited in the driver store associated with a DIID that takes the form of oemnnn.inf, where nnn represents a one- to three-digit decimal number. Note: if you want to find this nnn number for any driver in the store (known as an index), you must use NirSoft’s excellent DriverView. The tool I recommend in this story won’t show it to you.
Note that the driver-handling process as documented says nothing about cleaning up older drivers present in the Windows driver store (in %SystemRoot%\System32\DriverStore\FileRepository). Thus, this article focuses on investigating the contents of that driver store and removing older and/or obsolete items to reduce its on-disk footprint.
Warning! There’s an important downside to consider when removing elements from the driver store. If you remove all drivers except for the most recent one(s), you will not be able to use the Roll Back Driver option in the Properties window for the related device in Device Manager. That’s provided to help users revert to an earlier version of the driver, should the current one prove unstable.
Indeed, when only one driver is present for a Windows device, the Roll Back Driver button is grayed out and inaccessible (see Figure 1) in its properties window.
 Ed Tittel / IDG
Figure 1: When only one driver version is in the Windows driver store, the roll back option is unavailable. (Click image to enlarge it.)
A more conservative approach to pruning your driver store might therefore be to keep the two most current drivers for any given device, rather than only the most current one. I myself do not follow this approach, except for drivers that are updated frequently or when using a beta driver. Those who maintain deployment images would be well-advised to follow this advice when testing drivers (and candidate deployment images). But all extraneous files, including duplicate or obsolete drivers, should indeed be pruned from images prior to deployment.
Getting the lowdown on device drivers in Windows 10 and 11
For all modern Windows versions (7 and newer) there’s an excellent tool available to explicitly observe and manage the Windows driver store. That tool comes from GitHub, and it’s called Driver Store Explorer (also known as RAPR.exe). Version 0.11.92, the current version as of this writing, works quite well with both Windows 10 and 11.
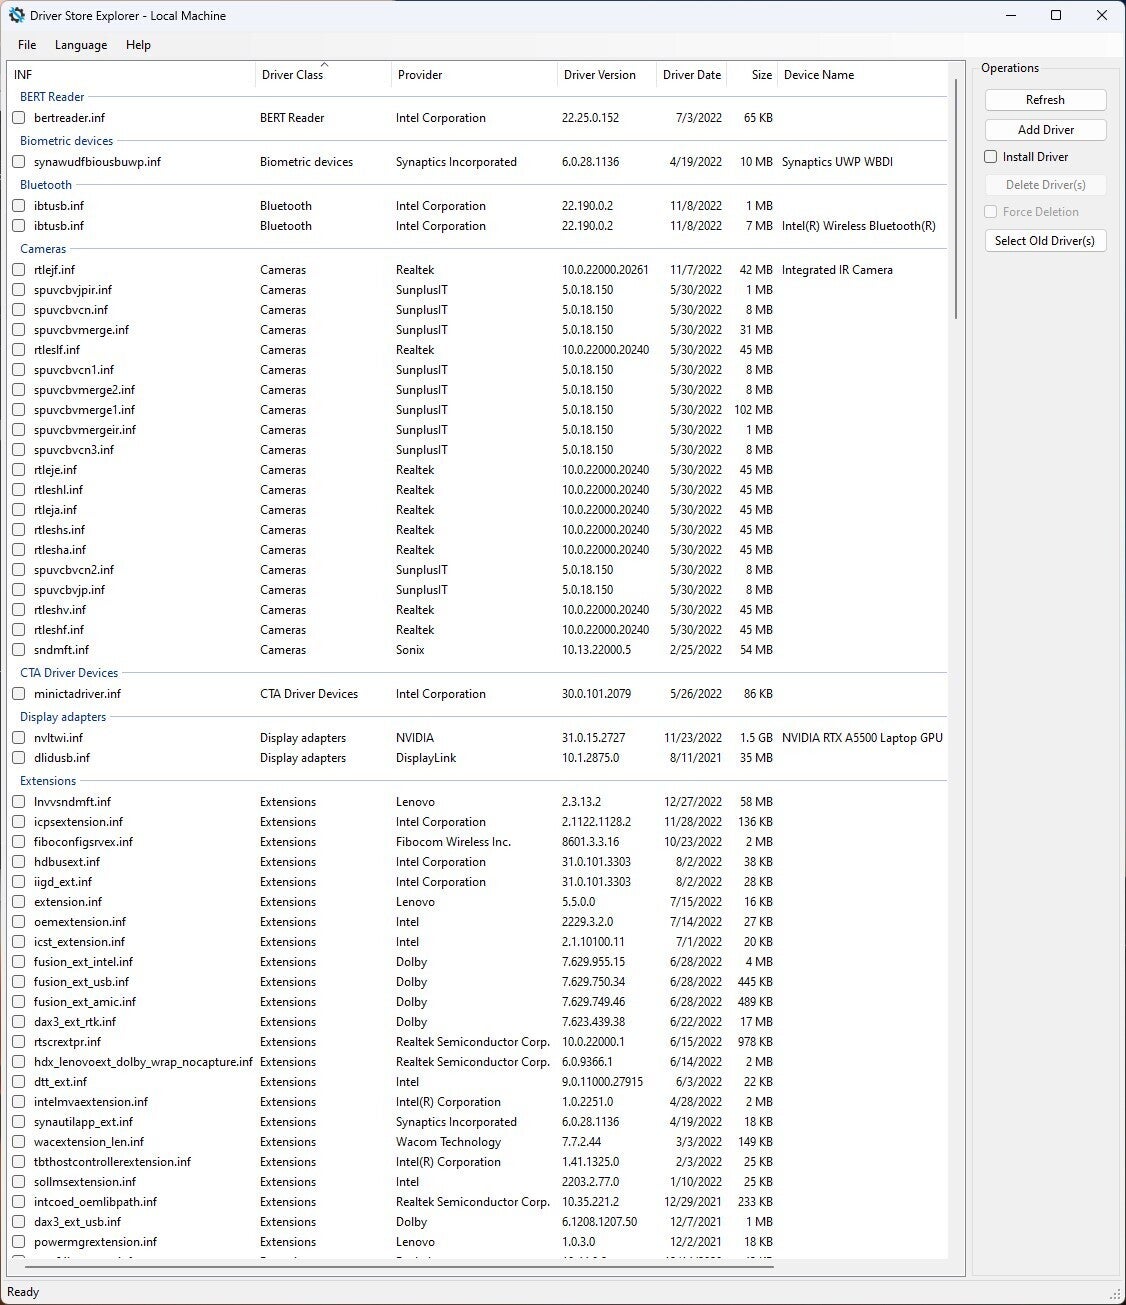
To operate on the driver store, you must run RAPR.exe with administrative privileges (right-click the filename and then select “Run as administrator” from the resulting pop-up menu). Next, you must enumerate the items in the driver store, which produces a display that looks like Figure 2.
Figure 2 shows my Lenovo P16 Mobile Workstation’s driver store after cleaning it up with RAPR. Before cleanup, I had 155 drivers; after cleanup there were 118 left. Thus, 37 were removed. This reduced the size of the Driver Store from 5.84GB to 4.30GB, to recover 1.54GB of disk space, based on properties for the FileRepository folder in which driver files reside.
 Ed Tittel / IDG
Figure 2: After cleanup, the P16 Mobile Workstation sports 118 total drivers (down from 155). (Click image to enlarge it.)
To give you an idea of what can happen to this repository for driver files, I’ve seen the total item count on this same machine go as high as 160, of which more than 40 items were duplicated Intel drivers of one sort or another (mostly Bluetooth or Wi-Fi). If you click on any of the column heads shown in this display, the listing will re-sort itself based on values in that column.
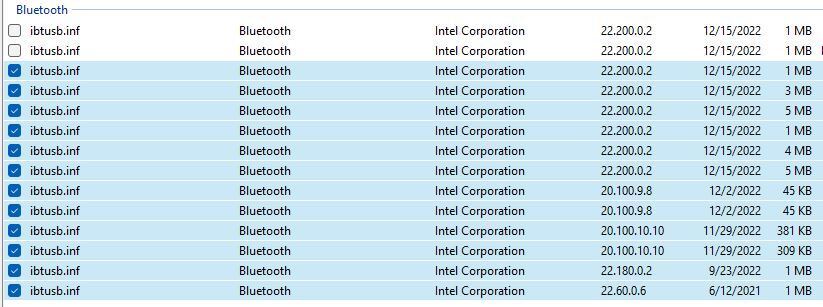
As I mentioned earlier, the Intel DSA and Nvidia GeForce Experience tools are the worst offenders when it comes to causing driver bloat. Intel’s tool seems particularly prone to deposit up to dozens of copies of the same driver in the driver store. My example cleanup, depicted in Figure 3, shows seven instances for each of two Bluetooth USB devices. All are named “ibtusb.inf” because the target PC has two sets of USB ports, and each one uses a separate driver instance.
Note: For whatever reason, if you have multiple instances of devices on (or in) your PC, you must indeed have a separate copy of a driver package (oemnnn.inf) for each one — that’s why you shouldn’t always remove what might look like unnecessary duplicates of the same driver on a PC. But high counts of the same driver — or worse, high counts of multiple versions of drivers for the same device — usually warrant cleanup. Fortunately, RAPR can handle this on your behalf.
Clearing out unwanted drivers with RAPR
To prune drivers, click the Select Old Driver(s) button at the top right, then click Delete Driver(s). RAPR handles the rest for you.
And don’t worry: it will not delete any drivers currently in use. That’s what the “Force Deletion” option is for, but you’ll seldom need it. The only times I’ve ever used RAPR’s force delete capability is when multiple sources of good advice have urged removal of a bad or questionable driver so that it can be replaced with a different, working, and older version. This is especially likely for printer drivers, for some reason.
Figures 3 and 4 show a before and after sequence to illustrate what typical cleanups involve.
 Ed Tittel / IDG
Figure 3: Duplicate/obsolete Bluetooth devices galore appear on the P16 Workstation. (Click image to enlarge it.)
 Ed Tittel / IDG
Figure 4: After pruning, only newest instances appear. (Click image to enlarge it.)
When you consider that drivers for a typical graphics adapter consume over 1GB of disk space and that many device drivers require at least 2 to 4MB, it’s easy to see how dropping unwanted entries can free up some real space.
When is driver store cleanup needed?
An old internet saying applies to Windows system optimization and cleaning as well: YMMV, an acronym for “your mileage may vary.” This means that different systems or deployment images will inevitably exhibit different behaviors, values, and so forth.
With that caveat in mind, take a look at the properties for your driver store directory: if it’s over 5GB in size, I’d fire up RAPR and see what it can find; if it’s over 8GB, you’ll definitely want to see what’s in there and get rid of what you no longer need or want. I’ve seen some instances where the folder’s size exceeded 10GB. Trust me: you don’t want to let things go that far.
Note for admins: When you update a deployment image for distribution, you will often update items in the driver store. Because this does not automatically clean up older entries as you add new ones, you must use RAPR (or some equivalent command-line shenanigans) to clean out duplicate and obsolete entries. The only thing worse than extra, unneeded drivers in the store on one PC is as many such copies as you’ve got images running in your enterprise!
With Nvidia display drivers typically consuming 1 to 1.2GB per copy (or version), keeping older drivers around is quite literally a waste of space. You can keep two versions for safety if you like (simply uncheck the next-to-most-recent version after using RAPR’s Select Old Driver(s) option), but there’s no reason to keep more than two in the driver store. For a clean and tested deployment image, it should have only as many copies of any driver as it needs, and no more than that. (Before I started doing regular cleanups myself, I might find a dozen or more Nvidia display drivers on a PC with a one-to two-year-old OS image running.)
You really have to work at it to hurt yourself using RAPR, so you needn’t feel compelled to make an image backup before cleaning up your driver store. But because I’m a “belt-and-suspenders” kind of guy, I’ve gotten into that habit, just in case I accidentally remove something it turns out I really need. You can always reload that backup from the repair/recovery media for your PC if you wind up with a failing or unbootable machine after a too-aggressive cleanup. (Or you can mount the old image as a VM inside many backup utilities, such as Macrium Reflect Free, and pluck the drivers you need from that driver store using RAPR’s export and install tools.) Who knows? Either could come in handy. With a backup you can clean up whatever you want, whenever you want without fear.
This article was originally published in November 2015 and updated in May 2023.
Copyright © 2023 IDG Communications, Inc.
This story originally appeared on Computerworld

