ChatGPT is OpenAI’s extremely useful chatbot for answering questions. Here’s how to use the generative AI tool in Apple’s Notes app in macOS.
Apple Intelligence is now integrated with OpenAi’s ChatGPT in macOS, ad well as iOS and iPadOS. Many features of ChatGPT are integrated with Apple apps starting in macOS Sequoia 15.1, and iOS and iPadOS 18.2.
While Apple has stated support for Apple Intelligence and ChatGPT are evolving and still in progress, some features are working and included in Apple’s operating systems. Expect a further phased rollout of Apple Intelligence and ChatGPT in the near future.
For a complete review of new Apple Intelligence iOS and iPadOS features, see our article iOS 18.1 & iPadOS 18.1 review: baby steps with Apple Intelligence.
In order to use ChatGPT in Notes, you have to have a subscription to ChatGPT Plus ($20/month), Pro, Enterprise, Team, or Educational. OpenAI has stated support for ChatGPT free tier integration in macOS will be coming later in 2025.
OpenAI has a pricing page, and at $20/month, the Plus tier is fairly reasonable. Plus or higher also gives you access to o1 and o1-mini models.
If you already have Apple Intelligence and the ChatGPT extension enabled, skip to the last section “Using ChatGPT in Notes”. Even so, the next section below has some useful info on where ChatGPT is available in Apple apps.
What’s included
In the above versions of Apple’s operating systems, Apple states Apple Intelligence is integrated into Notes, Photos, Siri, Safari, and other apps with Writing Tools. ChatGPT is also integrated into some of the apps.
For example, you can now use ChatGPT prompts in Siri for lookups. Apple Intelligence Writing Tools work anywhere there is a text field.
Writing Tools include summarizing text, rewriting text, proofreading, and even composing text. Apple also provides summaries in the form of Notification summaries, web page summaries, and others.
Summaries for web pages in browsers are particularly useful. Some third-party browsers such as Firefox also support summaries.
You can turn off Notification summaries separately in System Settings->Notifications->Summarize Notifications.
Apple promises that using Apple Intelligence does not send your data to Apple (although some parts of Siri can still require this).
Turning on Apple Intelligence
Before you can use ChatGPT in Apple’s apps you must first turn on Apple Intelligence in the System Settings app (or the Settings app in iOS).
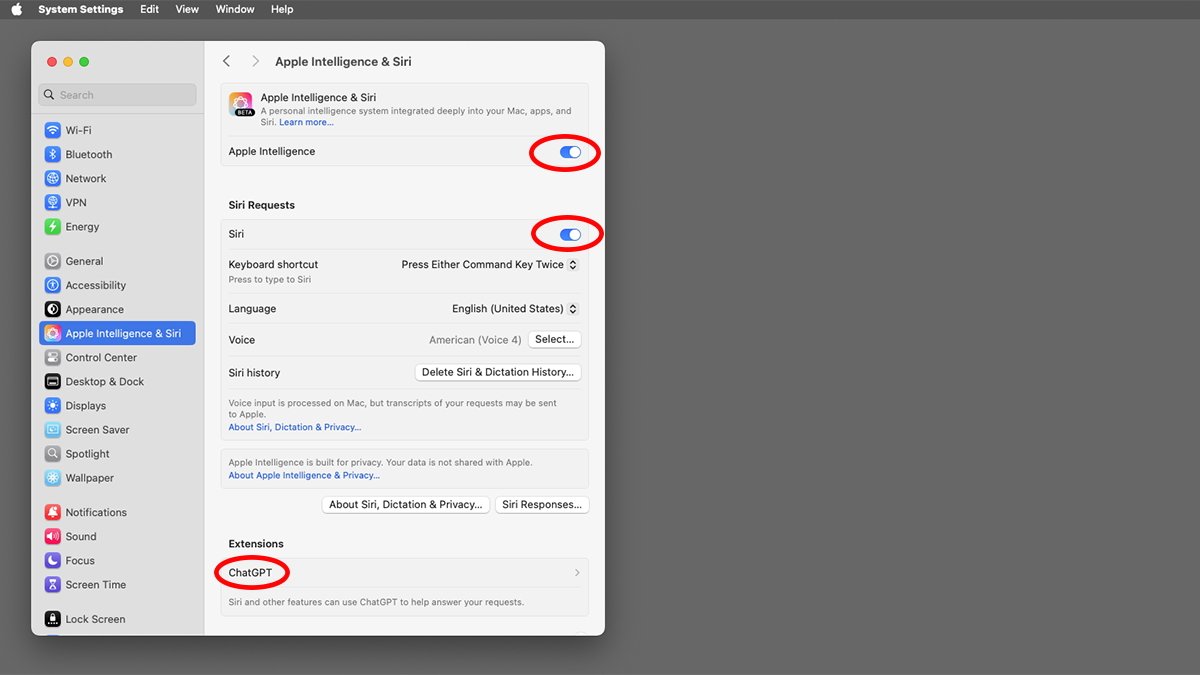
To do so, open System Settings in the /Applications folder on your Startup Disk (or from the Apple menu), then scroll down and click on Apple Intelligence & Siri on the left.
Next, on the right, click Get Apple Intelligence to begin the setup process. After clicking the button it will be replaced with text reading “In Progress…” while the additional software is downloaded and installed.
This may take a while (up to an hour or more on some Macs).
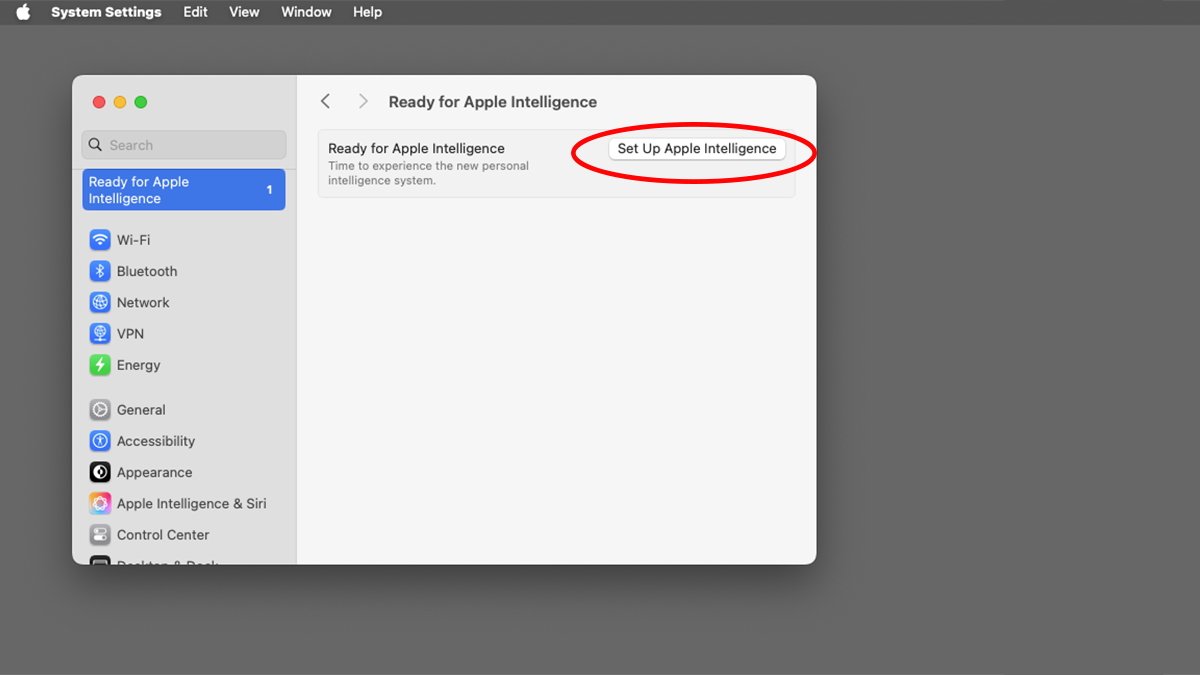
Once that is completed, you’ll get a notification that your Mac is ready to use Apple Intelligence. The System Settings button will reappear, but this time it reads Set Up Apple Intelligence.
Clicking that button displays a sheet that walks you through setting up each feature of Apple Intelligence. This is not unlike the sheets that appear when you set up a new Mac.
The first step is choosing which apps use summaries. You can skip this part by clicking Set Up Later if you don’t want summaries.
Next, you’ll step through Siri setup, but mind that there’s no way to opt-out on the sheet at this point. The setup notifies you that Siri may send some of your data to Apple (including audio), but that the data is not tied to your Apple account.
Click Continue, then select a Siri Voice from the list provided. Click Continue again.
Now the sheet gives you a chance to opt out of sending your data to Apple if you want. Click Not now to opt-out, then click Continue.
Apple Intelligence and Siri are now fully enabled and you can turn either off or back on by using the two sliders that appear in System Settings. Also now enabled at the bottom of the Apple Intelligence & Siri pane is an Extensions section, one of which is for ChatGPT:
Turning on ChatGPT
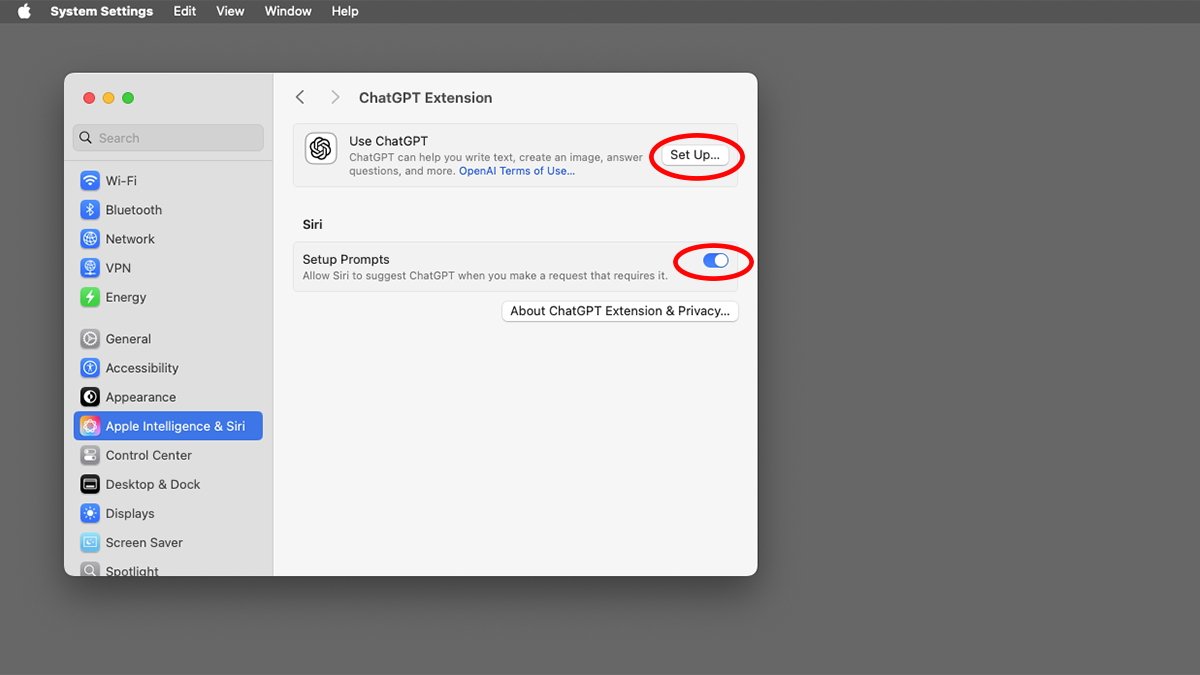
Go ahead and click ChatGPT under Extensions to set up ChatGPT. There’s also a slider for determining if you want to allow Siri to recommend using ChatGPT in some instances.
Next, click the Set Up… button next to Use ChatGPT.
You’ll now get another sheet telling you what ChatGPT can do: integrate with Siri, compose text in Writing Tools, and work with a ChatGPT account. Click Next – which leads you to another sheet informing you that the Mac works with ChatGPT in a way that preserves your privacy:
- You decide what gets shared with ChatGPT
- You can turn ChatGPT off in System Settings any time
- You can use ChatGPT with an account, or use it anonymously
If you want to use ChatGPT with an account, click the Use ChatGPT with an Account button. Otherwise, click the Enable ChatGPT button to use it anonymously.
There’s also a privacy note button that gives you a text summary of Apple’s and OpenAI’s policy on ChatGPT privacy in the extension. If you want, you can Select All (Command-A) on the text, copy it by Control-clicking, then paste it into a file in TextEdit or another editor for later review.
Of particular note are these paragraphs:
“If there is no explicit request to use ChatGPT, your request is analyzed to determine whether ChatGPT might have useful results. If it does, Siri will ask whether you would like to use ChatGPT. If you choose, Siri will send your request to ChatGPT and present the answer directly. You also can choose to disable Siri asking you to confirm whether Siri should send a request to ChatGPT by going to Settings > Apple Intelligence & Siri > ChatGPT, and tapping to turn off Confirm ChatGPT Requests.
When you use Writing Tools and visual intelligence with the Camera Control, you will be able to choose whether you would like to use the ChatGPT extension for each of these features separately.”
The note then goes on to explain that, in anonymous mode, it is OpenAI’s official policy that it must not store requests, or their results (unless required by law), and it must not use requests to train its models. Attached documents are also not stored in anonymous mode.
In anonymous mode, OpenAI does not receive any info about your Apple account, and your IP address is hidden from OpenAI servers. General location information is however sent for the purposes of “enabling ChatGPT to prevent fraud and comply with applicable law”.
You can turn off ChatGPT and its interaction with Apple Intelligence in the Extensions pane at any time, in the same way that you turned it on. You can also leave Apple Intelligence and/or Siri turned on, even if you turn the ChatGPT extension off.
After you’ve read and understood the Privacy statement, return to the Extension pane, and click Enable ChatGPT. Once ChatGPT is enabled in System Settings, you can later click the Sign In button, and turn it off entirely using the slider.
OpenAI “Advanced Capabilities” are free up to a certain limit, then basic ChatGPT functionality is available until twenty-four hours have elapsed.
There’s also a slider for confirming Siri requests.
This completes the set up of both Apple Intelligence and the ChatGPT extension.
Using ChatGPT in Notes
Once Apple Intelligence and ChatGPT have been enabled, you can now use them in Writing Tools in any app that supports text editing – including the Notes app.
Currently to use ChatGPT/Notes integration you have to be signed into a ChatGPT account because OpenAI has to verify your paid pricing tier. If you’re not signed in, go back to the Extension pane in System Settings for ChatGPT and click the Sign In button.
You’ll also need to go to the Settings page for your ChatGPT account, enable the Works With Apps setting, then click Manage Apps to select which apps you want to allow ChatGPT to work with.
To use ChatGPT in Notes, open the Notes app, select any note on the left, then press Option+Shift+1 on your keyboard. This brings up the ChatGPT prompt in which you can type a question to get an answer for the information contained in the selected note.
If, for some reason, the Note can’t be processed, ChatGPT servers can’t be reached, or you’re not signed in to ChatGPT, you’ll hear the macOS system sound.
There’s also a voice mode you can enable to control ChatGPT.
What’s next?
ChatGPT integration with Apple apps is exciting because it promises to take automation to a whole new level. This includes lookups, summaries, editing, condensing, composing, and more.
What would really be cool would be for Apple to provide some other automation features from a UI standpoint (much like AppleScript does today). For example, one could imagine telling ChatGPT to select all notes with certain titles or content, and then merging them, condensing their content, removing parts of content, or sending them somewhere else.
Voice control combined with UI interaction could be really powerful.
Imagine having one hundred notes in the Notes app and telling ChatGPT to “Merge all notes containing Apple-related content”. That could save hours.
The possibilities may be endless.
This story originally appeared on Appleinsider


