When things go wrong with Windows, as they sometimes will, nothing ensures a faster or easier return to normal than restoring a recent image backup.
To that end, I back up my production PCs at 9 a.m. every day. That means that I’ll never lose more than a day’s work if something should go badly enough wrong to force that day’s image backup to be restored.
In the sections that follow, I explain what all this means, how it works, and why you shouldn’t use built-in backup in either Windows 10 or 11. Finally, I’ll walk you through how to use my favorite free image backup tool while recommending a couple of other acceptable alternatives.
What is an image backup, anyway?
Simply put, an image backup is a snapshot of the complete contents of all partitions on a computer’s C: drive. In other words, it’s an exact copy (“image”) of the drive — operating system, data files, settings, and all — not just the files stored on it. Image backups are sometimes called system image backups, whole-system backups, full system backups, or other variations on that theme.
If you look at the disk layout for a typical C: drive, you’ll see that it usually includes four or more partitions, as shown in Figure 1.
 Ed Tittel / IDG
Figure 1: The default Windows 10 and 11 disk layout includes 4 partitions: (1) EFI, (2) MSR, (3) Windows OS, and (4) Windows Recovery Environment (WinRE). (Click image to enlarge it.)
(Please note: I use the excellent, no-cost MiniTool Partition Wizard Free instead of Windows’ built-in Disk Management tool because Partition Wizard shows the Microsoft Reserved, or MSR, partition along with other partitions on the C: drive; in Figure 1 it occupies 16MB in position 2.)
When you make an image backup, all the bits and bytes for each partition are captured. And when an image backup is restored, the previous contents of the drive are overwritten, as the image for each partition is written to the target drive afresh and anew.
How image backup works
Making an image backup involves making a snapshot of the contents of each partition on one drive and storing those contents within an image copy for each partition on another drive. TechTerms.com describes a disk image as “a file that contains an exact copy of a disk’s contents” that “replicates all of the data from the source disk, including folder structure and hidden metadata.”
Indeed, all partitions on a physical disk will be captured in the resulting image file. Given the right software (I’ll show a demonstration later on in this story), you can explore an image just as if it were a standalone file system.
To create an image, special software is used to build a single file (or collection of files) that represent the whole disk or its constituent partitions. Disk image files are often stored using special binary formats. Thus, for example, the .ISO image format (a CD- or DVD-oriented disk image format based on the ISO-9660 standard, which Microsoft uses to distribute images of the Windows installation environment) contains an exact duplicate of a disk image, including data saved in files on that disk, as well as file system information and related metadata.
Built-in Windows backup utilities are inadequate for image backups
Microsoft has recently introduced a new backup app to both Windows 10 and Windows 11. It’s named Windows Backup, but, alas, that name is a little misleading, as is Microsoft’s claim that it’s “a one-stop backup solution.” This tool can back up files and folders, apps and settings, and stored credentials, but it can’t perform an image backup or restore same on a Windows PC. Since that’s the crux of backup as a system and OS recovery tool, it doesn’t qualify for the purposes of this story.
There’s also a legacy backup utility in both Windows 10 and 11 that can create image backups; it appears in Control Panel as “Backup and Restore (Windows 7).” But having followed ongoing backup and restore discussions on Windows Ten Forums since October 2014, and on Windows Eleven Forum since June 2021, I can say that none of the participants speak in favor of using the old tool any longer. Most Windows gurus recommend using something else because of occasional (but credible) reports of problems when restoring images made using the legacy tool.
And Microsoft itself has clearly backed away from the old tool. The company’s current “Back up your Windows PC” support article no longer even mentions the Backup and Restore (Windows 7) utility.
Fortunately, there are many, many better options available. In fact, Tim Fisher at LifeWire lists 32 free Windows backup utilities in a recently updated article.
Recommended third-party image backup tools
I recommend four workable, respectable, and highly regarded Windows backup tools that work with Windows 10 and 11 with equal facility. Alas, the first listed (and my personal favorite) no longer offers a free version. IMO, the tool is good enough to be worth buying, but for those who cannot purchase, the other three are acceptable.
All four tools make compact, speedy, and reliable image backups of Windows 10 and Windows 11 PCs. Below I walk through using EaseUS Todo Backup on Windows 11 as an illustration of how such programs work. Your mileage may vary, depending on which tool you choose.
Create an image backup
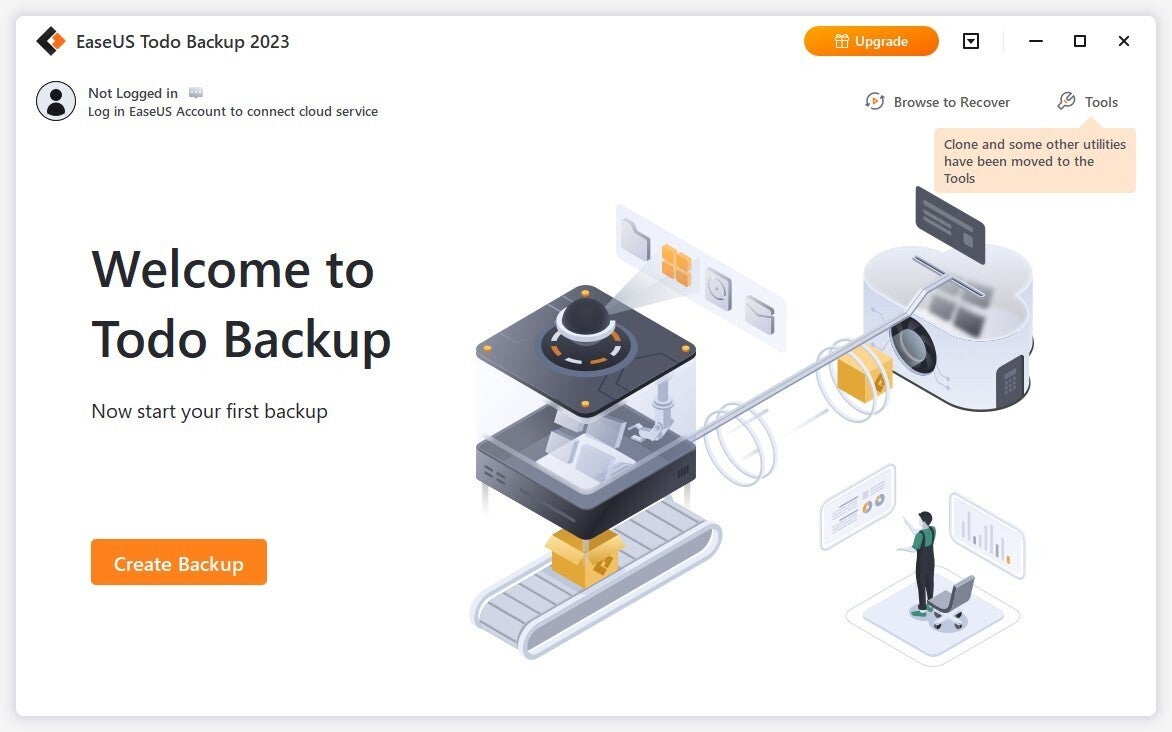
When you launch EaseUS Todo Backup for the first time, it provides a Create Backup button for your first backup efforts, as shown in Figure 2.
 Ed Tittel / IDG
Figure 2: First time around, EaseUS Todo Backup provides a welcome with a “Create Backup” button. (Click image to enlarge it.)
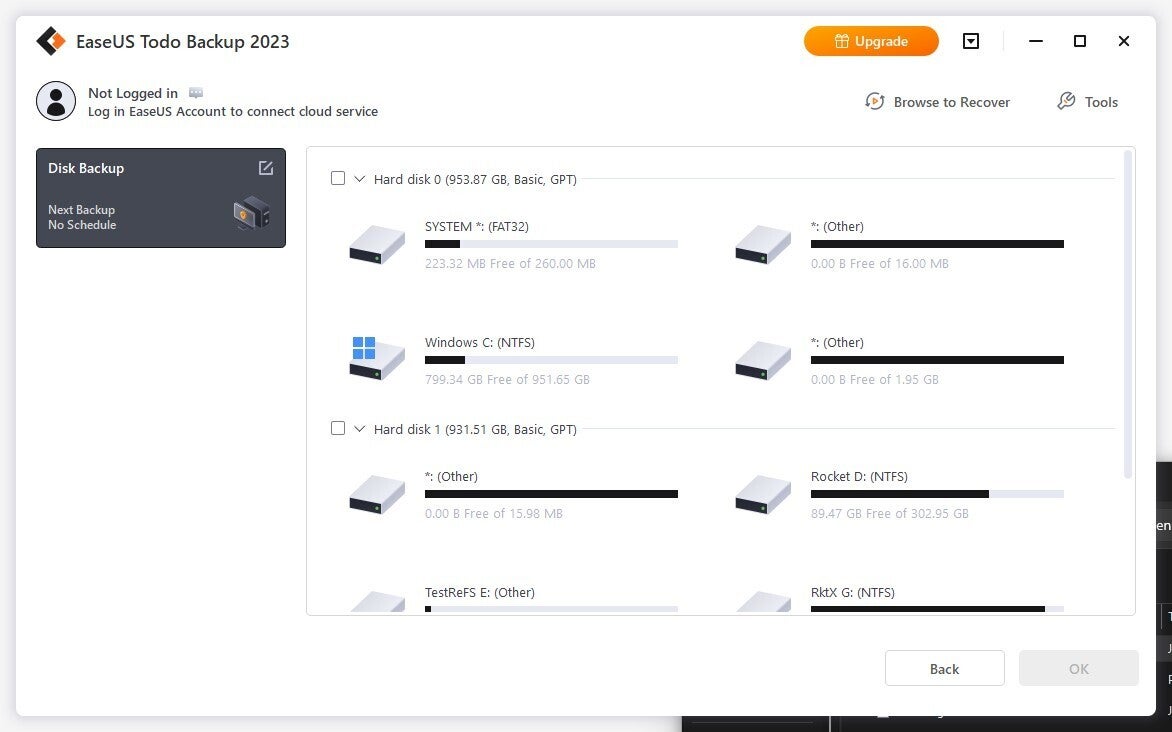
After clicking that button, you’ll see a left-column menu entry that reads “New Backup” with a series of options that include File, Disk, OS, and Apps data. To create an image backup, pick the Disk option. On my test laptop, Hard Disk 0 is the System/Boot disk, as shown in Figure 3 — whatever its disk number might be on your PC, that’s the one you want to pick.
 Ed Tittel / IDG
Figure 3: Click the checkbox for the Boot/System disk, then click OK. (Click image to enlarge it.)
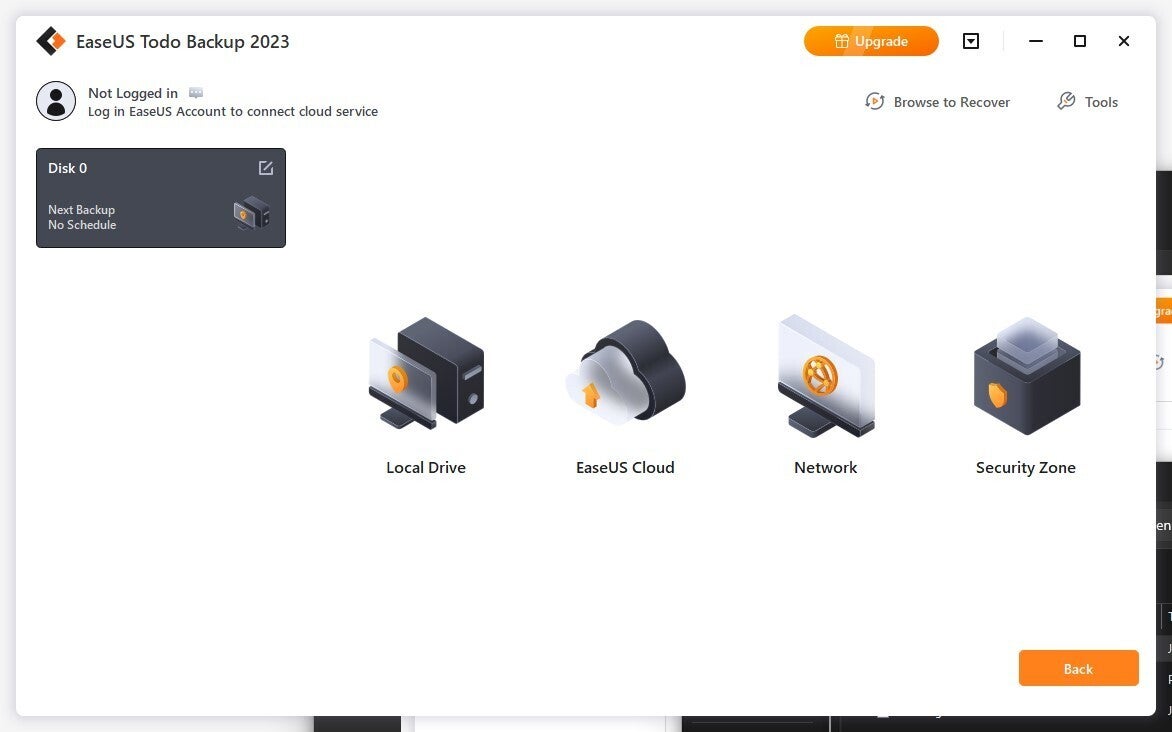
Next you must click a destination for the location where the backup will reside. You’ll be shown options that include Local Drive, EaseUS Cloud, Network, and Security Zone, as shown in Figure 4. Though you’re free to explore other options on your own (EaseUS does offer access to added-cost cloud storage), for this illustration I’ll choose Local Drive.
 Ed Tittel / IDG
Figure 4: Pick the left-hand option, Local Drive, to save the backup to another drive on the target PC. (Click image to enlarge it.)
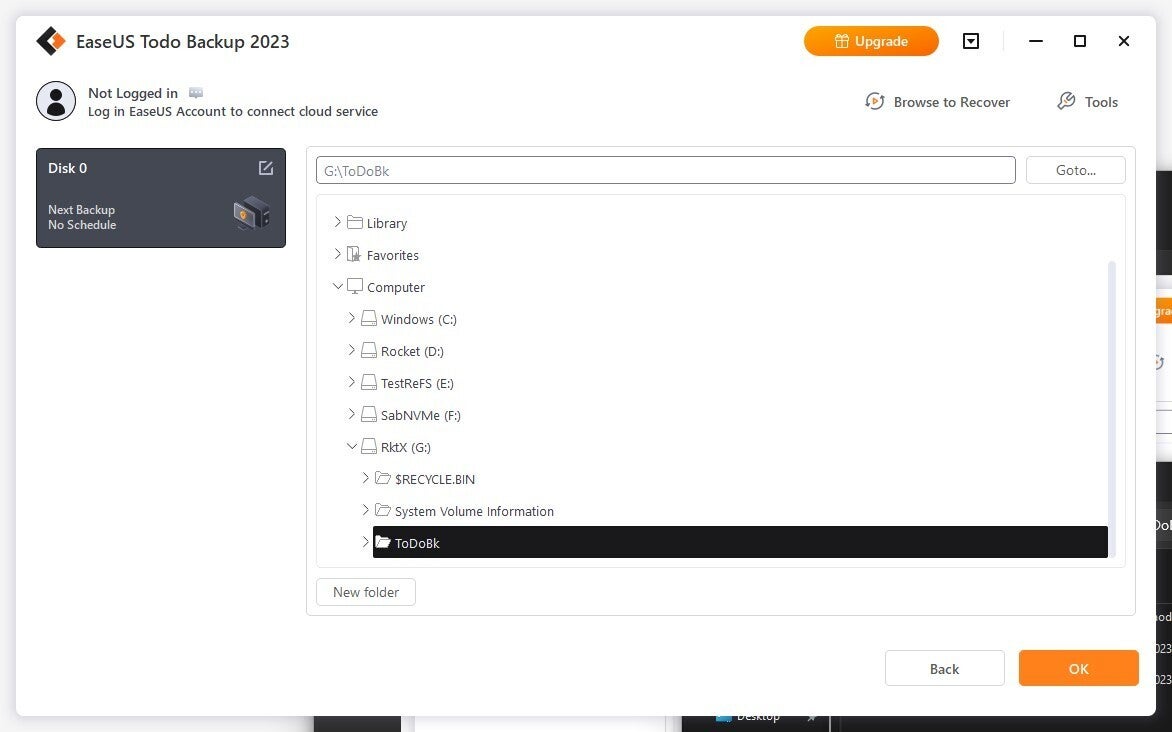
I’m going to pick an NTFS partition on a local USB-attached NVMe SSD named RktX that takes the drive letter G: as my destination. Thus, it’s highlighted in Figure 5, down to a folder named ToDoBk, after which I must click the OK button to finalize that selection.
 Ed Tittel / IDG
Figure 5: Click OK to target the G:\ToDoBk folder as the backup destination. (Click image to enlarge it.)
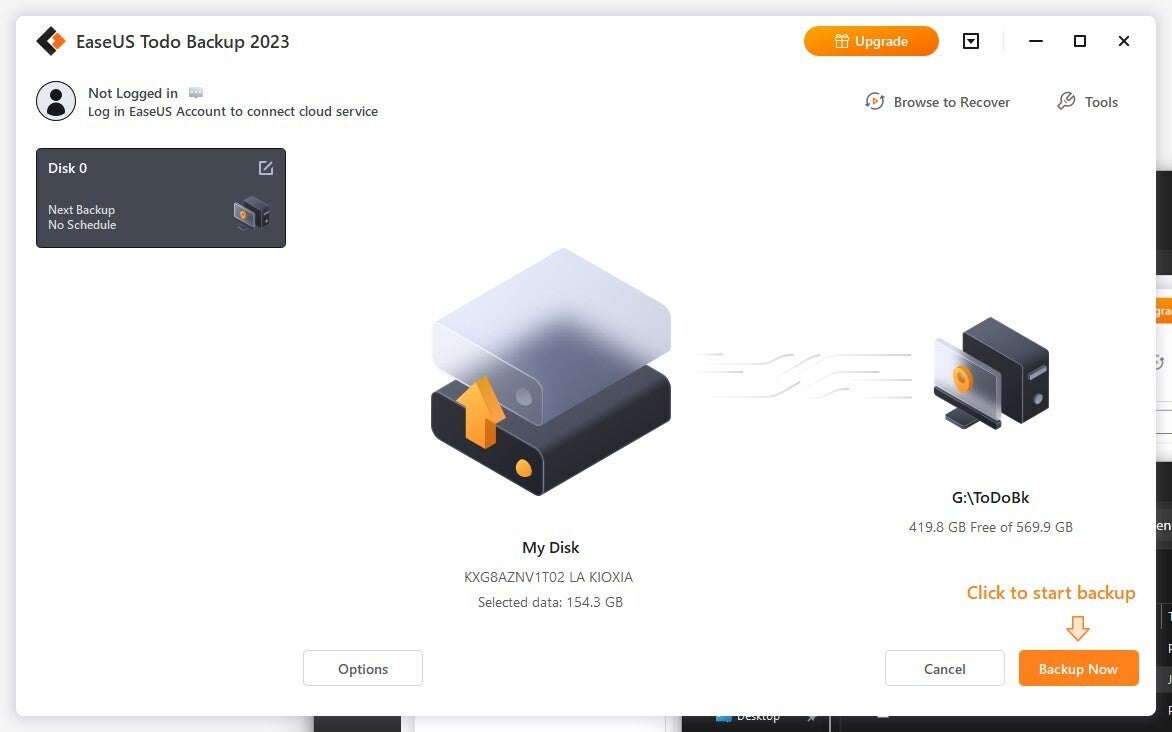
Finally, you can click the Backup Now button shown in Figure 6 to fire off an initial image backup.
 Ed Tittel / IDG
Figure 6: Click the Backup Now button to fire off an initial image backup. (Click image to enlarge it.)
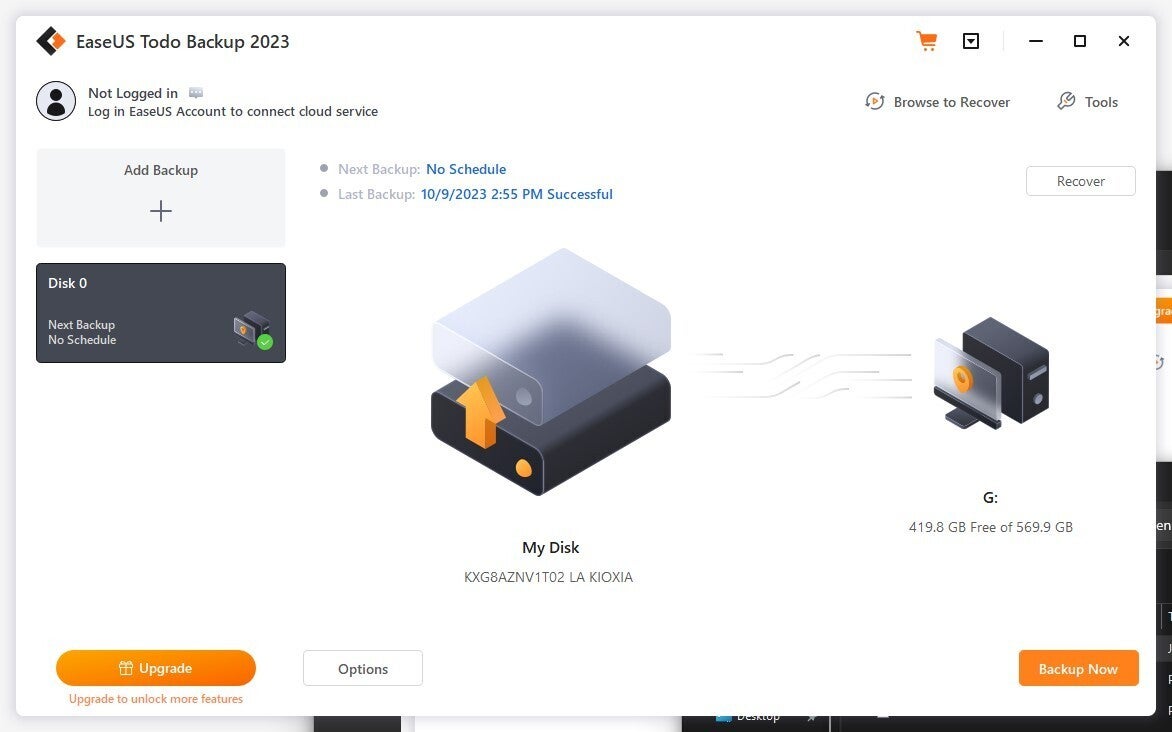
By default, the program creates a full image backup for a first snapshot. When you add a backup definition — use the Add Backup + button shown at upper left in Figure 7 — you’ll have the option to create multiple backup types and schedules. On my test PC, a 2022 Lenovo P1 Gen 6 Mobile Workstation, the first backup took about 9 minutes to complete.
 Ed Tittel / IDG
Figure 7: After the initial backup completes, it shows “successful” status (top, center). Notice there’s “No Schedule” defined at this point. (Click image to enlarge it.)
Schedule and refine backups
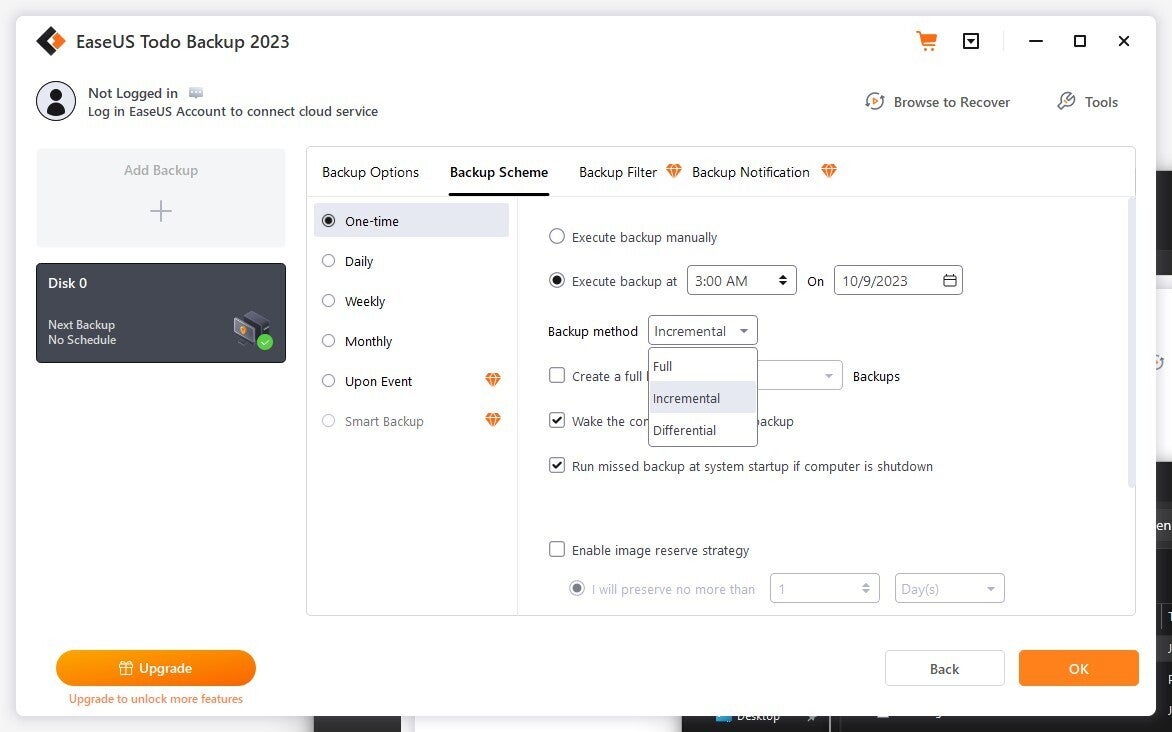
You can refine what EaseUS does, and set up a schedule, by clicking on the No Schedule link shown in Figure 7. The screen that appears is shown in Figure 8, where you’ll notice that the Backup Scheme tab is selected. Here you’ll find options to schedule one-time, daily, weekly, or monthly backups as well as other scheduling options, times, reserve strategies (how many backups to keep or how much disk space to consume), and more.
 Ed Tittel / IDG
Figure 8: Among its many options, EaseUS Todo lets you choose backup method (incremental, full, differential). (Click image to enlarge it.)
As shown in Figure 8, you can make Full, Incremental, or Differential backups at a scheduled time. A Full backup is a complete snapshot of the source disk’s contents. An Incremental backup copies only files that have changed since the last Full backup, and a Differential backup copies only files that have changed since the most recent backup (of any kind). Differential backups are fastest to make but can take the longest to restore, and full backups take the longest to make but are fastest to restore, with incremental somewhere in between.
The other tabs for backup definitions include Backup Options (which cover mode, performance settings, file size and splitting, custom commands, and more), Backup Filters (let you skip various system, temporary and other — e.g., windows.old — files that need not be backed up for successful restoration), and Backup Notification settings.
Other backup functions
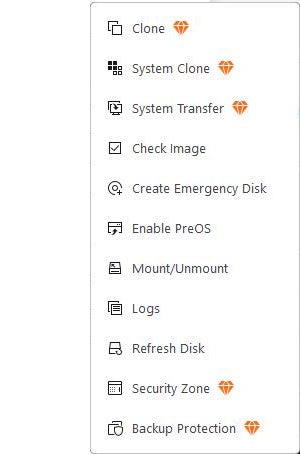
The Tools menu at the upper right in most Todo Backup windows provides access to a variety of functions and capabilities that readers will want to explore. There you’ll find tools to perform a variety of functions, as shown in Figure 9. (Items with orange gemstones are not available in the freeware version of Todo Backup.)
 Ed Tittel / IDG
Figure 9: Of the items shown, those that lack orange gemstones are available in the freeware version.
The list of available functions includes the following:
- Check Image: reads and validates a target image file (good idea to check before restoring, just to make sure things are OK).
- Create Emergency Disk: set up USB-attached media from which to boot and run a restore operation, if the system isn’t booting or running properly.
- Enable PreOS: Adds an option to the boot menu to make it faster to run a restore operation after reboot.
- Mount/Unmount: lets users mount or unmount backup images, which may be inspected (and copied from) while mounted.
- Logs: provides access to EaseUS Todo Backup logs collected during operation (records what gets backed up with time stamps plus errors and other information as observed).
- Refresh Disk: lets you rescan all disks and volumes in an active Windows filesystem.
To use the other functions, you must first pay for and activate a license for a commercial version of the program. Every window in the free version has an Upgrade button in the lower left corner to let you do that (not to mention the many advertising screens the free version also displays to its users).
Restore an image backup
Should you ever need to restore an image backup, it’s an easy thing to do. Typical reasons range from the sublime (such as OS corruption, driver failures, boot manager problems, malware attacks) to the ridiculous (accidentally deleted key OS files that make a system unusable or unbootable).
Though EaseUS Todo Backup (and the other programs cited earlier) offer program menu-based restore functions that are easy to use, when a restore is needed, I often find myself turning to the program’s Emergency Disk. It is bootable and smart enough to let you point to the backup image you wish to restore quickly and easily. For me, that usually means the most recent backup before things started going south.
The built-in Browse to Recover item on most Todo Backup screens works almost exactly like the restore function available from the Emergency Disk boot-up. When you click Browse to Recover, you’ll gain access to the drive and backup image you want.
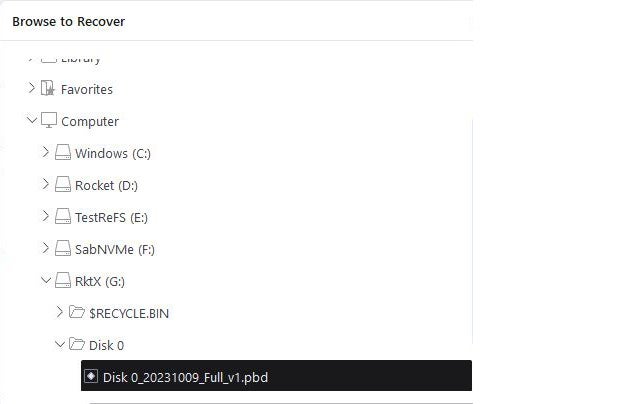
It is important to know the drive letter for your image backups and the name of the folder where they’re stored. On my test PC, I know that’s Drive G: in the Todo folder and named Disk 0, where such backups take a .pbd (EaseUS Todo Backup program database) file extension. There the latest backup is easily identified by its date and version suffix (pick the most recent date and the highest version suffix), as shown in Figure 10. That’s the one I would want to restore.
 Ed Tittel / IDG
Figure 10: Navigate to the drive and backup image you want, then click OK to restore.
Simply click the OK button to get the restore process underway: Todo Backup does the rest.
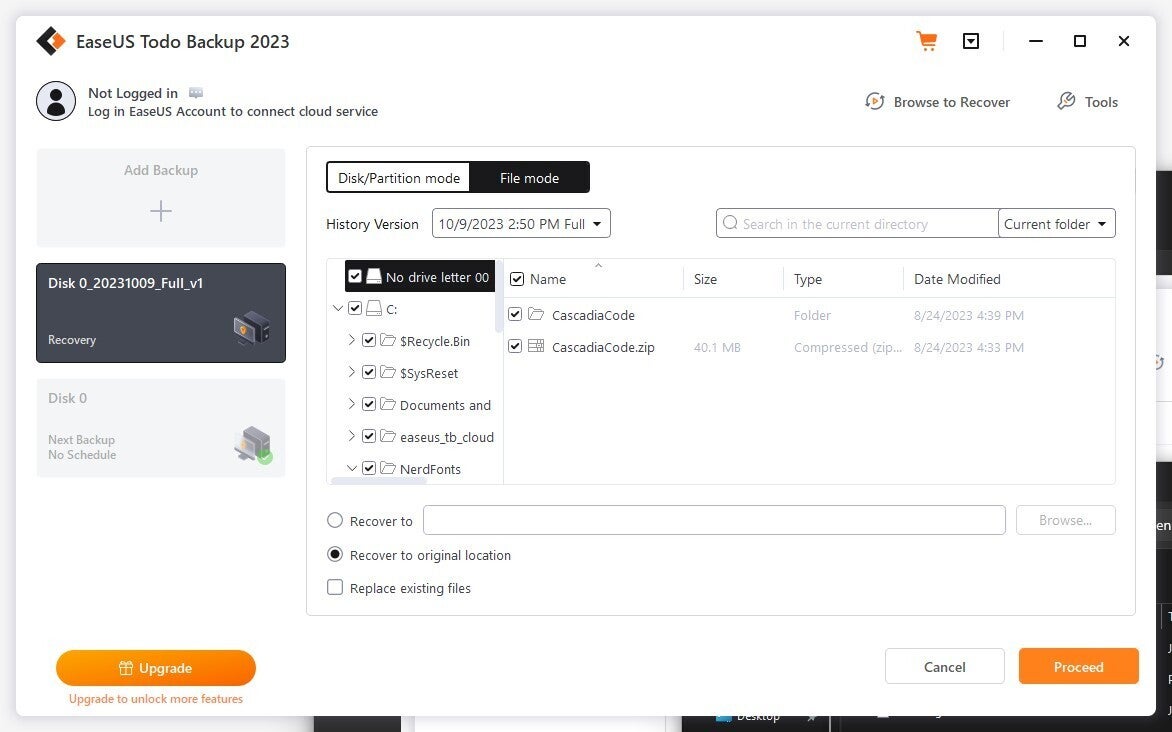
Todo Backup (and the other programs) also offers file- or folder-based restore capabilities. To use them, you’d click the File mode item shown highlighted in Figure 11. This opens a File Explorer-like interface that lets you designate which image you wish to explore, then select files and/or folders within that image to restore to the current running Windows image. It’s just like copying files and folders, which I assume readers can handle without step-by-step instructions, so I’ll skip those details here.
 Ed Tittel / IDG
Figure 11: Select the files or folders you want to restore. (Click image to enlarge it.)
A new potential wrinkle for Windows 11 backup
With the introduction of Windows 11 version 23H2 in October 2023, Microsoft allows creation and use of volumes formatted in the Resilient File System (a.k.a. ReFS). This comes exclusively in the form of a “Dev Drive” from the Dev Home app. As the name suggests, this tool aims primarily to support software developers, but it is freely available to any and all Windows 11 users through the Microsoft Store.
There’s no point in creating volumes if you don’t back them up. Thus, if you plan to use ReFS, choose backup software that supports it. All of the backup packages listed in this story do support ReFS; if you look beyond these four, choose wisely!
Pick your backup, and use it to the max!
My own personal backup choice remains Macrium Reflect. You can pick any of the options I’ve presented here as you see fit. For speed’s sake, you may want to consider targeting a fast drive (ideally an NVMe PCIe-x4 SSD) on which your backup images will reside.
But the important thing is to back up regularly and often. That’s your best guarantee to minimize data loss if and when the time comes to restore a backup. Better to not need it and still have a backup than to need one and have none.
This article was originally published in April 2022 and updated in February 2024.
Read this next: For more Windows repair techniques, see “How to repair Windows 10 and 11 in 4 steps.”
Copyright © 2024 IDG Communications, Inc.
This story originally appeared on Computerworld

