Apple’s Configurator is one way to restore or recover a Mac. Here’s how to use it to revive an Apple Silicon Mac.
There may be times when you need to restore your Mac to a previous state – or to revive your Mac when it stops working for some reason.
Apple’s device provisioning and configuration app called Configurator lets you do just that.
Configurator is part of Apple’s larger enterprise offerings and is designed to allow mass deployment of Apple devices quickly and easily across large and small teams.
The idea behind Configurator is you can use it to restore Apple devices to some predetermined state without having to reinstall an operating system by hand onto each one.
Configurator also lets you manage device provisioning – for example, to install ad-hoc software to devices, or to configure them for development teams.
Note that to do a Mac revive or restore using Apple Configurator, you’ll need two Macs and a USB-C to USB-C cable.
Getting started
To get started with Apple Configurator, download it from the Mac App Store to your Mac. It downloads to the Applications folder.
You can run it from there, or you can copy it to another volume, in which case it will still work just fine.
Configurator was originally designed for managing and provisioning iOS devices for corporate use, but version 2.x added the ability to restore Macs also.
You can also add Macs to your organization using the iOS version of Configurator, but its features are more limited than the Mac version.
After downloading Configurator, open it in your Mac’s Finder to get started.
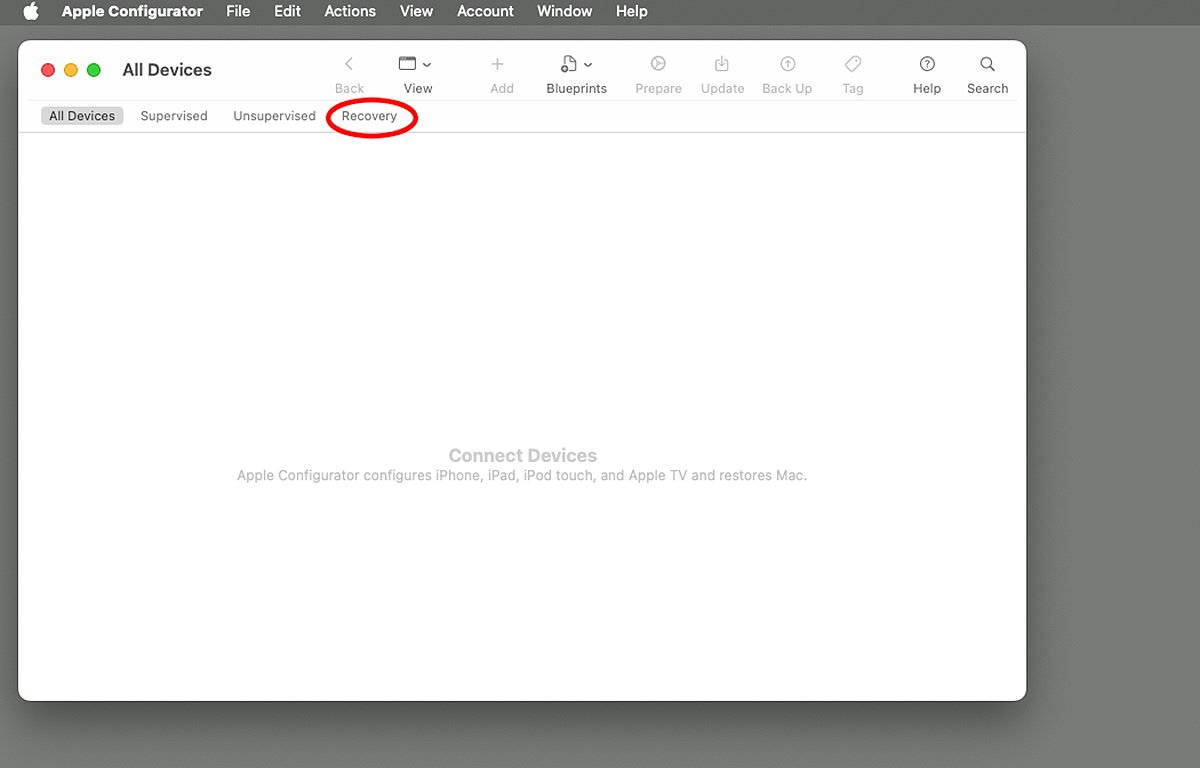
Of particular importance for the Mac is the Recovery tab on the right of the secondary toolbar in the main window.
There’s also a (mostly for iOS) command-line Configurator tool (cfgutil) for Terminal which you can install from the Apple Configurator->Install Automation Tools menu item.
You’ll need an admin password on your Mac to install it. Once you’ve installed the cfgutil, run Apple’s Terminal app located in /Applications on your Startup Disk and type:
man cfgutil and press Return on your keyboard for usage details.
But for the examples below, you probably won’t need it.
Reviving a dead Mac using Configurator
In very rare cases, a Mac may become unresponsive, or unbootable due to a firmware failure. In these cases, the Mac can’t be revived without restoring its firmware first and erasing its internal storage.
If this happens to your Mac, first try restarting it using an external startup disk, then running Disk Utility’s Disk First Aid on the internal volume, and then rebooting.
If that doesn’t work, next try using Recovery mode by booting the Mac by holding down the power button from an off state (for Apple Silicon Macs), or holding down Command-R on the keyboard from a powered-off state (Intel Macs).
Once in Recovery mode, try using Disk Utility to repair or recover the internal drive. If that doesn’t work either, then you’ll need to restore the default firmware in the Mac and start over.
Since the Recovery mode software lives in each Mac’s firmware, if the firmware becomes inoperable you won’t be able to boot into Recovery mode.
Preparing for revive or restore
Apple calls the process of restoring a Mac’s firmware a revive. Note that performing a revive doesn’t change anything on a Mac’s existing startup disk – it only restores the default firmware and recoveryOS to its original state by flashing the Mac’s firmware.
By contrast, a restore is referred to by Apple as the process of doing a revive plus restoring a Mac’s internal Startup Disk to its bootable state. Sometimes this can also involve a full re-install of macOS onto the Startup Disk.
You’ll also need twoMacs to do a revive or restore since they have to be connected together via a USB-C to USB-C cable. An internet connection is also required.
To get started, connect the two computers via the USB-C cable via their USB-C ports on the side. It’s also a good idea to make sure both are plugged into an A/C outlet, but if you can’t plug both into A/C at least make sure the one you’re restoring from is.
For Apple Silicon MacBooks and the Mac mini, Apple says to plug the USB-C cable into the leftmost of the USB-C ports on both machines. For Apple Silicon iMac and Mac Studio models, Apple says to plug the USB-C cable into the rightmost of the USB-C ports on both machines
For the Apple Silicon Mac Pro, Apple says to plug the cable into the USB-C port farthest from the power button – unless it’s a rackmount Mac Pro – then plug the cable into the USB-C ports closest to the power button.
Finally, make sure the second Mac is shut down, then run Apple Configurator.
Reviving steps
These steps are for reviving the target Mac’s firmware and installing the latest recoveryOS, but leaving the contents of the Startup Disk as-is.
The steps to do a revive or restore on an Apple Silicon-based Mac are slightly different depending on whether it’s an iMac, Mac mini, Mac Studio, or Mac Pro.
- Disconnect iMac from power
- While holding down power button, connect power, hold power button for three seconds
- When revive or restore begins you’ll see the Apple logo and progress bar
For Mac Studio, Mac mini, or Mac Pro, the steps are roughly the same, but a little different:
- Disconnect from power for at least ten seconds
- Press and hold the power button
- Reconnect power
- Release power button
The status indicator light should go amber, and the “DFU” logo should appear in Apple Configurator.
Once revive or restore starts, you will see the Apple logo and progress bar on the Mac you are restoring.
For Mac portable computers, make sure the Mac is shut down first, then plug it into power and press and release the power button.
Press the power button again, and press the right Shift key, left Option key, and left Control key on the keyboard all at the same time for about ten seconds. Continue to hold all four buttons down.
After ten seconds, continue to hold the power button down, but release the three keys on the keyboard until “DFU” appears in Apple Configurator on the first Mac.
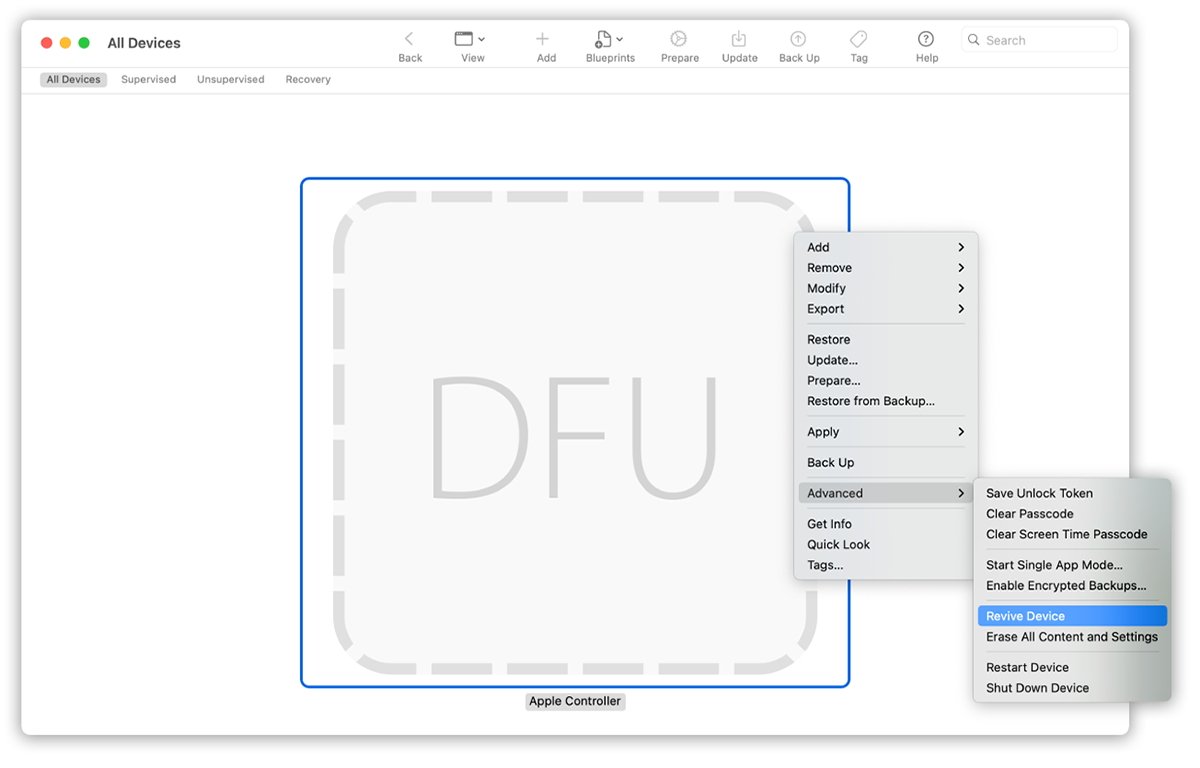
To revive the second Mac’s firmware, select the “DFU” icon in Apple Configurator for the Mac you want to revive, and select Actions->Advanced->Revive Device, then click Revive.
Alternatively, you could Control-click the selected DFU icon, choose Advanced->Revive Device, then click Revive.
If either Mac loses power during the revive or restore, restore power and start the process over.
Wait for the process to complete. You may see the Apple logo appear and re-appear several times on the target device.
If the process completes successfully, the target Mac will reboot when finished.
Reviving steps with macOS reinstall
These steps restore the firmware, recoveryOS, then erase the internal drive and reinstall a clean version of macOS onto it:
In Apple Configurator on the first Mac:
- Select DFU icon of the Mac you want to restore
- Choose Actions->Restore
- Click Restore
- Wait for the process to complete
- Wait for Mac restart
- Complete macOS Setup Assistant on the target Mac
- Quit Configurator on the first Mac, unplug any cables
The steps are similar to the steps for Apple Silicon Macs, and in general, apply to Macs made in 2017 or later which contain an Apple T2 Security Chip.
Reviving in Finder using macOS Sonoma
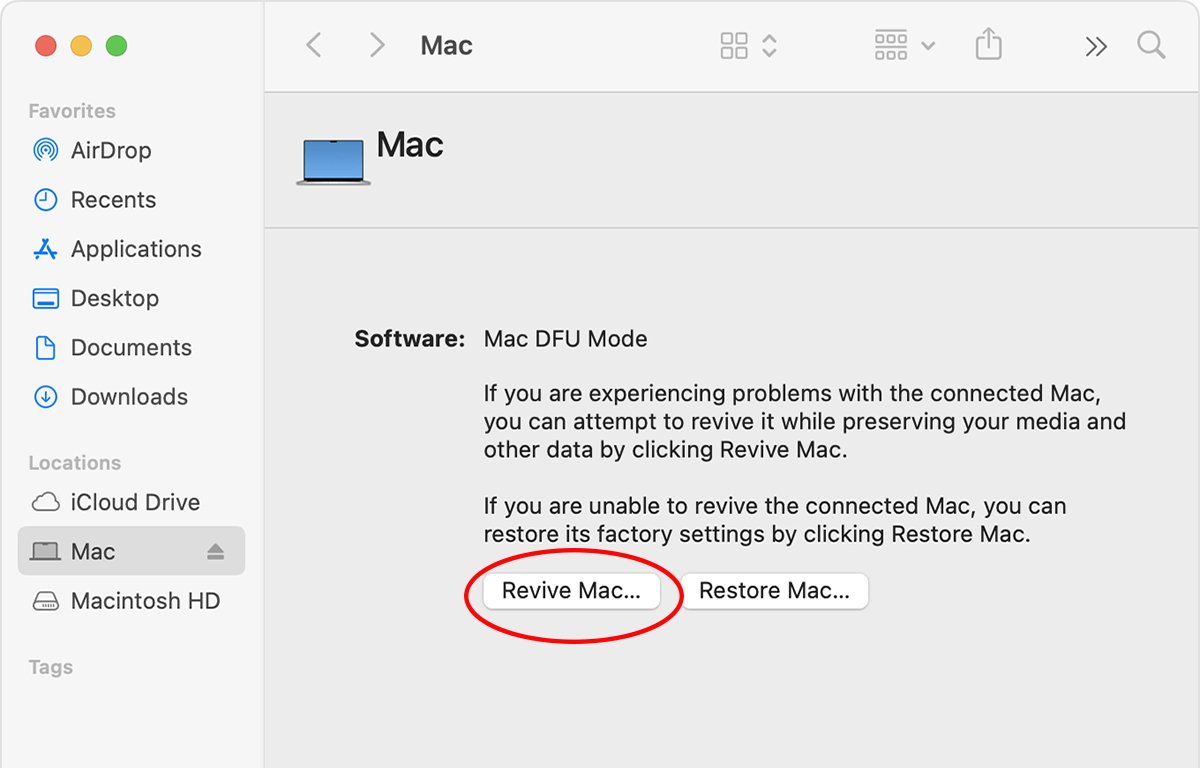
On some Mac models, in macOS 14 Sonoma Apple added the ability to perform a revive or restore in the Finder directly, without the need for Apple Configurator. In fact, Apple has a technote (108900) on how to do it.
The steps for doing a revive or restore in Finder are essentially the same as in Configurator. However, once you have the machines connected and powered on in the proper mods, you can select the target Mac in the sidebar in a Finder window and then click the Revive Mac or Restore Mac button to start the process.
There’s also a WWDC session Manage devices with Apple Configurator from 2021 and two others titled What’s new in managing Apple devices from 2022 as well as 2023.
Section 3 of Apple Device Support Tutorials page for Configurator 2 has a discussion of how to back up and restore iOS devices using Macs.
This story originally appeared on Appleinsider


